October 9, 2010

Scrapspiration

I got this box of scraps from my awesome friend Chantry ... (who also just threw me the loveliest baby shower ever!).  Cute, fun, bold, sweet fabrics!  


I am feeling inspired.  And, I found this - it WILL make its way into whatever comes out of the scraps:


Inspiration is a beautiful thing.  
And now, maybe this will inspire you to do something silly:


Mom, me, Cousin Becky, and Sheri - woohoo! 

September 29, 2010

Whoops

Where have I been for the last three months, you ask?  Well, for one, I've been growing a baby (if this part of it is so exhaustingly hard, I REALLY have a lot in store for once it comes).  I also started tending to the garden a little more (errr ... well ... weeded once, watered a few times, and put up some deer fence).  Along with that came produce.  And more produce.  We've got tomatoes out our ears and are hoping to eek out some peppers before the first frost.  Then work started back in full force and I could no longer continue my blissful experience of sewing for 30 hours a week at work.  My machine got serviced in North Carolina at the end of July, and then it was visiting my mom.  I've got it back now, but still have yet to bust out anything incredible.


But also, I've been working on finishing up commissioned quilts.  I ended up doing SIX commissions this summer - yes, six.  One baby quilt, two large rectangular lap quilts, one wall hanging, one large square lap quilt, and a twin.


Pictures, you say?  OK, fine.  I guess it's the least I can do, since I've left you hanging for months now.  


Here is the large square lap quilt - I think it ended up being somewhere around 50"x50".  I made it for my college friend Lauren F. and was able to give it to her in person, when we had a girls' reunion at Lauren's family's lake house in Tennessee.  She did all the hard work in picking out the fabrics, and I had the fun job of putting them together.  
I opted for a modified "rail fence" pattern - modified because the strips in each block are different widths.  The most challenging part of the whole thing was placing the blocks in such a way that the patterns in each block did not touch the same pattern in any other block.  


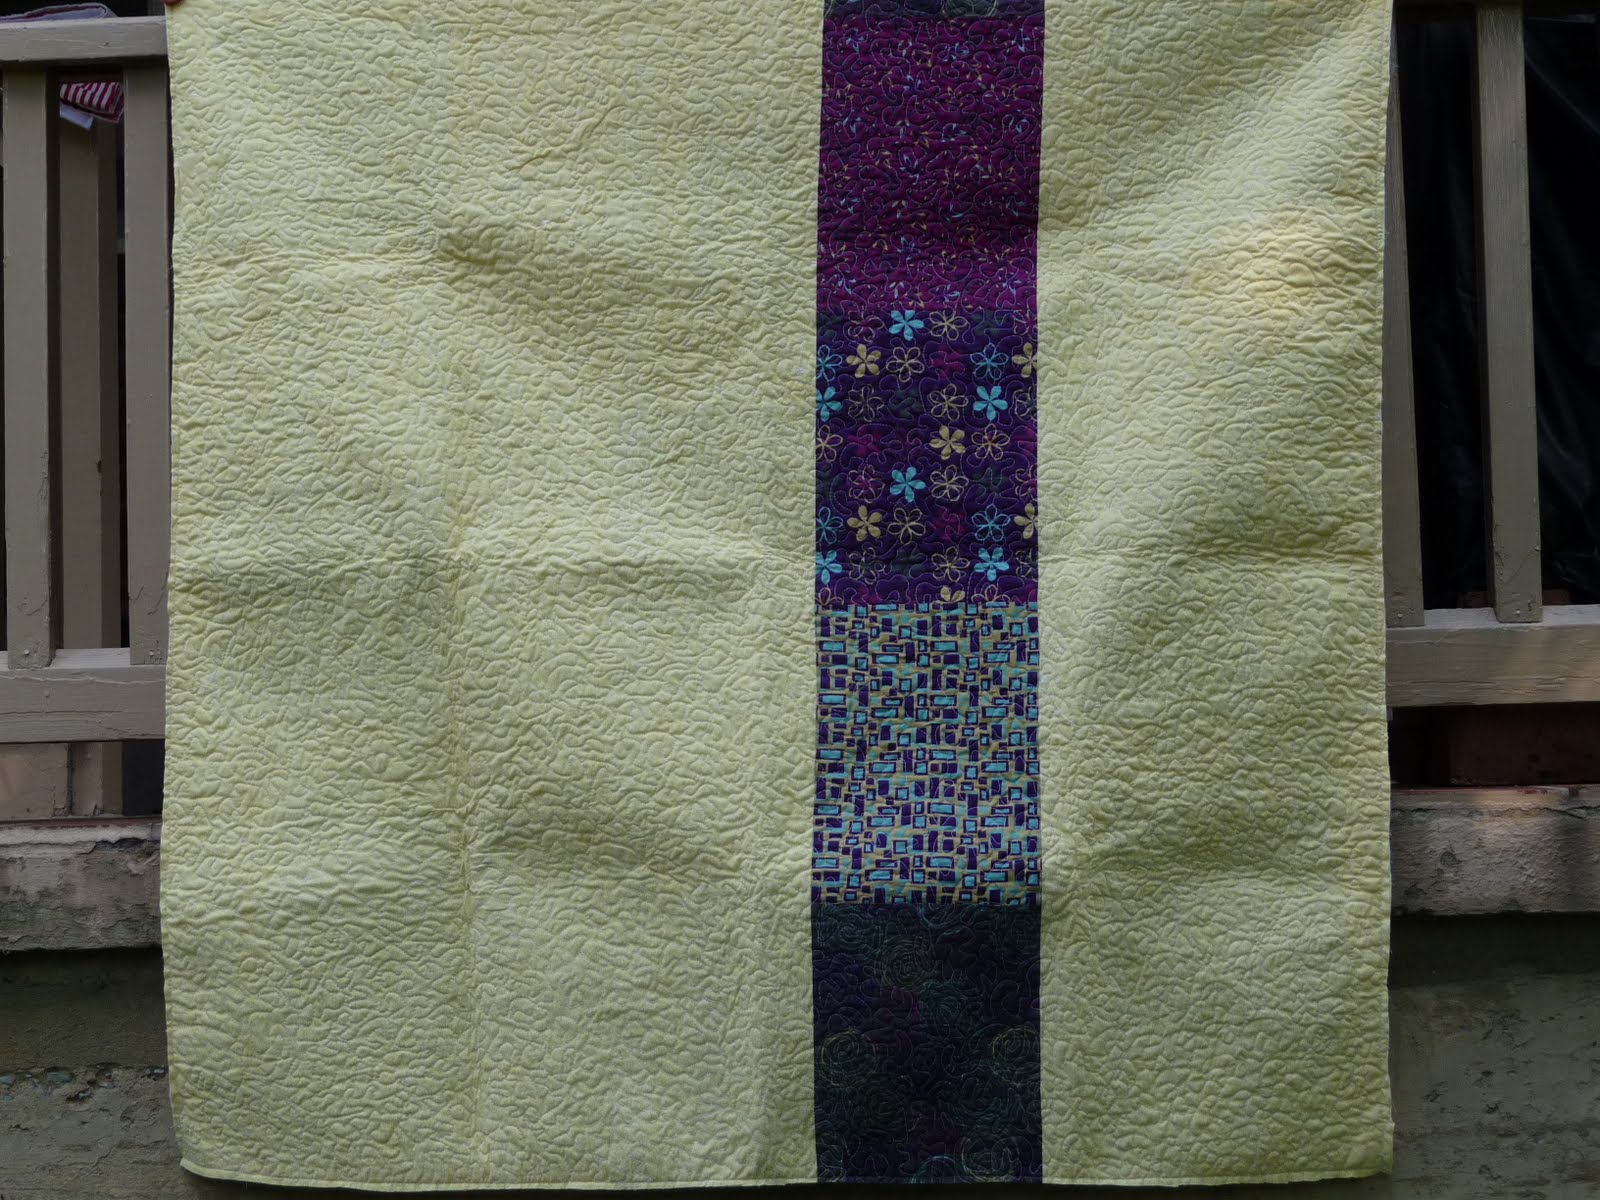
And the back - I really love it ...
(feel free to ignore the fold/crease lines.  Whoops.)


And kindly, Lauren sent me a picture of the quilt in its real, live home (which sounds awesome and tempts me to visit):
I have to confess, I am WAY more interested in this inviting rug than I am in the quilt, but that's just me.


I.  Will.  Post.  Again.  Before.  The.   Next.  3.  Months.  Have.  Passed.  I promise.

July 7, 2010

Wonky Log Cabin Tutorial #6 - The Last One!

Last week you finished your quilting, right? 
If you (still) need inspiration about what quilting pattern to use, look at Val's quilt here ... check out those groovy grid lines that form a diamond pattern.  I'm so excited about how hers turned out!

Feeling a little more adventurous with quilting?  Look what Andrea did:

Talk about groovy!  I love the swirls! 

Alright, this last binding tutorial is actually going to be a combo my-tutorial/other-blog-site-tutorial.  I don't feel the need to reinvent the wheel when it comes to binding tutorials.  And Amanda Jean over at Crazy Mom Quilts happens to have an excellent, step-by-step binding how-to.  So, check it out by clicking here, then come back to visit me so we can talk through it again.  (By the way, while you're there, look at her other quilts and be inspired!)

The binding is the very last thing you do to your quilt.  It finishes and hides the edges of fabric and batting that are still exposed, so it's worthwhile to do a quality binding.  If you haven't already, read through CMQ's tutorial and then read on:
Step 1: Measure the four sides of your quilt, add it up, and add 12.  Cut enough 2.5" wide strips (she does 2.25" but it's your choice - either width, just be consistent for all strips) to add up to that measurement.  Sew them together on the short sides so you end up with one long strip.
Step 2: Iron the long strip in half lengthwise with wrong sides together.  You should have a very, very long, very, very skinny strip.
Step 3: Match unfinished edge of quilt with raw edge of binding strip, and sew on around all four sides and corners.  (crazymom's tutorial is excellent for this step, especially for the corners.  Haven't read it yet?  You know what I'm going to tell you to do.  So just go do it.)
Step 4: Trim the edges of the quilt even with the binding strip edges.  Fold the binding over onto the other side of the quilt around the edge and sew it down with a needle and thread (by hand!)
Step 5: Enjoy this awesome quilt you just finished, and graciously accept compliments from your friends who can't believe how crafty and cool you are.

Alright, well that's it for this 6 part tutorial on how to make a wonky log cabin quilt!  Hooray for friends and quilting classes!  And thanks to the lovely women who have great taste in fabric and incredible talent - I loved working with you all!

A few more pictures:
Laura's quilt - still in progress
(she was out of town for a couple of weeks without a machine)

Caitlin's quilt (picture from last week)

Caitlin sews on her binding strip

A second wonky log cabin quilt that I'm working on finishing up
(the green border now goes all the way around the quilt)

June 30, 2010

Wonky Log Cabin Tutorial #5

Look at how far we've all come!  This is Val's quilt top, ready for basting and quilting:


For the last tutorial, we talked through the basting process, remember?  Basting is securing all three layers of the quilt together - the quilt top, the batting, and the backing - prior to quilting.  You have basting options - straight pins, curved quilting safety pins, or adhesive basting spray - and your choice just depends on your personal preference and style.  I started out using the basting spray, and LOVED it because it kept all the layers very secure while quilting.  I started moving away from using it because I couldn't afford it for all the projects I was doing.  But, whatevs.  It's your preference - try all three and see which you prefer. 
Check out Caitlin's quilt, all basted and ready to go (she used basting spray):


Alright.  This tutorial is about quilting.  You're probably thinking, "Isn't that what we've been doing all along?  Doesn't quilting mean 'to make a quilt'?"  Well, yes.  But it also means to sew through all three layers (top, batting, back) so they stay together.  A lot of traditional quilting is done by hand.  If you have the patience for that, kudos to you.  I do NOT have the ability to do that kind of thing by hand, so I always machine-quilt my pieces.  Side note: I typically use a regular 1/4" presser foot for quilting straight lines.  I have used a walking foot too, but really I don't see any difference in the quality of the quilting.  There's lots of debate research out there about regular vs. walking foot quilting.  Just do what you want.  It'll be OK.
Basically, you'll take your 3-layer basted quilt, and feed it through the machine, stitching in a pattern of some sort over the entire quilt.  There are a variety of pattern options out there.  Caitlin chose "stitch in the ditch," which means she sewed straight lines in each of the seams.  It doesn't really stand out on the front (because it's in the ditch, silly), but it shows up on the back.  I think that is a fun choice for a wonky log cabin quilt, because it adds some wonkiness to the back of the quilt too.  Just make sure you backstitch at the beginning and end of each seam - you don't want your masterpiece to unravel.


Others have decided on straight lines in a grid pattern - shows up more on the front and makes the quilt look "quilty" from both sides.  I'm a sucker for a soft, awesome quilty-quilt.  The more lines you stitch, the more quilty it'll look. 
You have tons of options - sewing a line down the middle of each strip, quilting a diamond or triangle grid pattern, only quilting the middle strips or outer strips, quilting 1/4" off the seam lines ... and on and on.  If you're not sure what to do, look around at what other people do, find quilts you like in magazines or on blogs, or allow the shape and pattern of the quilt to guide you.  It's fun to come up with new patterns, but it's good to know that you can just do a grid too.
Another side note: if you want to branch out beyond straight lines, and if you feel comfortable with your machine, you might want to try free-motion quilting.  Free-motion quilting gives you more control over the pattern, and you can do loops, circles, meandering patterns, or words.  I won't give you the tutorial on that (because it overwhelms me), but there are lots of good ones on other blogs (like this one or this one).  I will say, however, that you need to feel pretty comfortable with sewing and your machine before tackling a big quilt with free-motion.  Maybe try it out on a few potholders first.
Quilt the entire quilt - some readjustment may be necessary in the basting as you go along, but that's to be expected. 
Come back soon for Wonky Log Cabin Tutorial #6 ... the final step!

June 18, 2010

Wonky Log Cabin Tutorial #4

Two of five class members were away this week, so it was somewhat of a catchup/mishmash week as those of us who were left were at very different stages of quiltedness.  So, what I'm going to post is what we were scheduled to do this week, which two of the three got to.

Review from last week: finish adding fabric strips to each of the four squares and trim them to exactly 20"x20".  Sew them together - 2x2 - and iron seams.  This is your quilt top, and it is now complete!

This week: Press your batting.  The supply list calls for 1/2 yard of 90"-wide batting - a long, narrow strip.  Our trick is to cut the batting in half lengthwise and place the two halves next to each other to form a large 45"x45" square.  If the edges you line up are not straight, trim them so they are.


Using a zig-zag stitch set to the widest stitch width you can, stitch the batting together along the middle.  Do not overlap the batting, as it will create extra bulk in the finished quilt - just slide the batting pieces up next to each other and feed them through the machine.  Also, take care to evenly feed it through the machine - uneven feeding can cause gaps or bubbles.  If it does bubble, try steam-ironing the seam after sewing to see if it will press out.  And ... tada!  You're done with batting.


The next step is basting the quilt, which does NOT mean marinating it in its own juices during the course of cooking.  It DOES mean putting the back, batting, and top of the quilt together and securing it with pins or adhesive spray.  I've heard this called a "quilt sandwich" ... think of the basting as the toothpick in the sandwich.  (wait, can you tell that I'm getting hungry?  A giant BLT sandwich on toasted sourdough sounds incredible right now.  Toothpick required). 

Press the fabric you're going to use for your backing.  Depending on the size of your quilt, you may have to sew together some pieces to use for the backing.  For this tutorial, you want a square of fabric approximately 45"x45" - bigger than your quilt top by at least 2" on each side.  Most fabric on the bolt is 44 or 45" wide, so you should be just fine and not have to piece anything.  (As you'll see in the pictures below, I am making my demo quilt bigger than 2x2, so don't be thrown off and think you were supposed to be doing twelve squares when really it's just four.)  Because of the size of mine, I had to piece together some green and white fabric for the backing. 


Lay this backing fabric right side DOWN on a flat surface (floor or large tables work great).  Line your batting up about 1" in from the top right corner of the backing, and spread it out evenly over the backing fabric.  Use your hands to spread out any creases or folds or bubbles in the backing or batting. 


You may have some extra batting hanging over the edge of your backing - not a big deal.  It's good to have extra in case things shift.  And you'll always go back at the end and trim things up.  So, just leave it.

One more step to make your quilt sandwich - lay your quilt top, right side UP, on top of your batting about 1" in from the batting.  Smooth it out with your hands, working from the top right corner.  Make sure there are no creases, bubbles, folds, or other funny things going on. 


Now to baste the quilt (which I did not get any pictures of, sorry.)  You can use straight pins, curved quilting safety pins, or adhesive basting spray (all of which are sold at some Wal-marts and all sewing supply stores).  If you're using pins, secure a pin about every 10" in a grid on the quilt.  Make sure you're pinning through all three layers.  Also, you will probably have to adjust both the backing and the top a couple of times during the process, as you want both to be tight and without any slack (this is why it's good to have a little extra wiggle room with the batting and backing fabric).  If you are using the basting spray, follow the manufacturer's directions.


Alright ... see you next week for quilting!

June 16, 2010

Busy little bee

I have been sewing and quilting like mad, trying to make it through a bunch of projects that I had put off until summer.  There are three different projects below.  The first one - Red and White Whirlygiggle - was the very first quilt I saw on crazymomquilts in early 2009, and I've been wanting to make one ever since!  I quilted it in a window pane pattern - just about 1/4" from either side of each seam - and I am absolutely in love with it.  It measures about 40"x50", so it's not too big but would make a nice picnic blanket for two!  I thought about putting it up for sale in the shop, but I can't part with it.  I love it too much.

Front

Detail of front with window pane quilting

Back

The second quilt is one that my friend Dixie asked me to make for her.  She requested "purples" and "masculine" (she's so kind to her husband!) so I hope it delivers!  I really like the gray and the dark indigo.  The yellow on the back lightens the quilt up a little bit, but isn't too bright or feminine in my opinion.  It measures about 45"x45".

Front

Back

Quilt number three is another commissioned one - a baby boy quilt in blues and greens!  I was inspired by, of all things, a diaper bag (don't be weirded out, Allison!).  From the front, you can't see the quilting but I followed the lines of the center panel.  It shows up better on the back, and I am in love with this little softie!  Final size is approximately 42"x42".

Front

Back

I'm a busy little bee!  I've got three more commissions I'm working on ... one top is completely pieced.  The other two are in varying stages of planning.  I'll keep you posted!

June 11, 2010

Wonky Log Cabin Tutorial #3

You are reading a blog post by what may be the world's worst blogger.  I forgot the camera at class AGAIN.  I don't have it with me today either, to take staged "class" photos.  I read so many blogs that are just incredible, with all the guest postings, and professional-looking photos, and fancy schmancy things like frequent posts, that it makes me feel inadequate.  But really, I don't care too much.  Alright, I'm over it now.

For class #3, we continued sewing the fabric strips around the wonky square.  Depending on the width of the fabric strips you're working with, you may end up with between four and seven "layers" around the middle square.  For this particular project, I worked all the measurements out to (hopefully) end up with a 40" square quilt, which means each block needs to be at least 20"x20".  So, for each of the blocks, add a strip to the top, then the right, then the bottom, then the left of the middle square, ironing each piece down before sewing the next one on.  When you've completed a full round (four strips around the block), "square off" the block by trimming the uneven edges with a straight ruler and rotary cutter.  You can continue to make it very wonky by tilting the ruler when cutting, or not.  It's up to you.  Play around with the angles you cut and how much you cut off - it's fun to see the block shape up and get more interesting with each layer.  

Keep doing that until a block measures a little bigger than 20"x20".  Iron well.  Repeat for each block.

Trim each block to exactly 20"x20" square, or, if you're wanting to make smaller blocks, whatever size you want.  A good rule of thumb is that a baby blanket should be at least 36"x36".  This is the time when the phrase "square off the block" actually does mean make it square.  I promise I'm not trying to confuse you.

OK, you're done for this week!